Digital Ticketing Guide
Welcome to the Padres ticketing guide. You have your tickets, now what? The steps below will help you to sign into your Padres Account Manager to access and manage your tickets. Follow the step-by-step guides below to learn how to transfer or donate your tickets. All tickets are now digital and can be accessed in the MLB Ballpark app for scanning and entry at the gates on game days. Use the guides below for how to access your tickets within the app.
Download the MLB Ballpark app
- Search for MLB Ballpark app in your App Store (iPhone) or Google Play Store (Android) and download.
- Once downloaded, open the MLB Ballpark app.
- If you already have an MLB.com account, select Log in. If you do not have an MLB.com account, select Get Started.
- If you think you have an MLB.com account but cannot remember the password, select Log In and then select the Forgot Password button.
- You will receive a reset password email from MLB. Follow the prompts in the email to reset your password.
- Please Note: If you have trouble logging in, select “Get Started” and follow the prompts
- Once you have logged in, you will be asked to select your favorite team. Select San Diego Padres; it will turn brown when selected. Then press the Home button in the top left.
- The first time you login to the MLB Ballpark app, you will not see tickets loaded. To see your tickets, you will need to link your email address to the account. To do this, press Go to your MLB Account on the Home tab.
- You will receive an email to verify your account. If you have not received the email after a few minutes, select Resend. Once your email is verified, you will see a blue check mark by the email address.
- If the email address listed is incorrect, add the correct email in the Add Another Email field.
- Check your inbox for an email from MLB, open the email and click Verify Email.
- It may take a few minutes to refresh but once verified, you will see your tickets loaded in the Tickets tab

How to sign into Account Manager to access and manage tickets
Visit the Padres Account Manager page.
Click Sign In in upper right corner.
Enter email address associated with your Padres ticketing account.
Click Forgot Password and Ticketmaster will send an email with a temporary pin.
Follow the prompts to reset your password.
How to access your tickets in the MLB Ballpark app
- Download the MLB Ballpark app on the App Store or Google Play.
- After you download the app, select the Padres as your Favorite team to make it easy to access all Petco Park specific features like mobile ordering inside the ballpark.
- Login to the MLB Ballpark app using your MLB.com login credentials.
- Select the Home tab in the bottom left and then the silhouette button in the top left.
- Select My MLB Account Emails.
- Make sure the email address listed is the email registered with your Padres ticketing account (the one used to log into Account Manager). If it is not, add your Padres Account email by clicking Add Another Email.
- MLB will send a confirmation email to the email address added. Once confirmed, you will see the email address populate under My MLB Account Emails. To see your season tickets, click the My Ticket Accounts button and select the account registered with your Padres account.
- Your tickets will be accessible in the Tickets tab and Home tab for you to use and transfer.
- Tap to see your tickets specific to today's game via the Home tab.
- After selecting the tickets you’d like to view, you will be prompted to log in with your Account Manager log in, please note that this log in is different than your MLB Ballpark log in.
- To see a chronological list for your tickets, click the Wallet tab within the Tickets tab. Select a game and then an individual ticket to see the Scan View which is scanned upon entrance to Petco Park.
- If sharing your Membership with family or seat partners, they may also download the MLB Ballpark App and sign in with your credentials if you wish for them to have equal access to the tickets.

How to transfer tickets via Account Manager
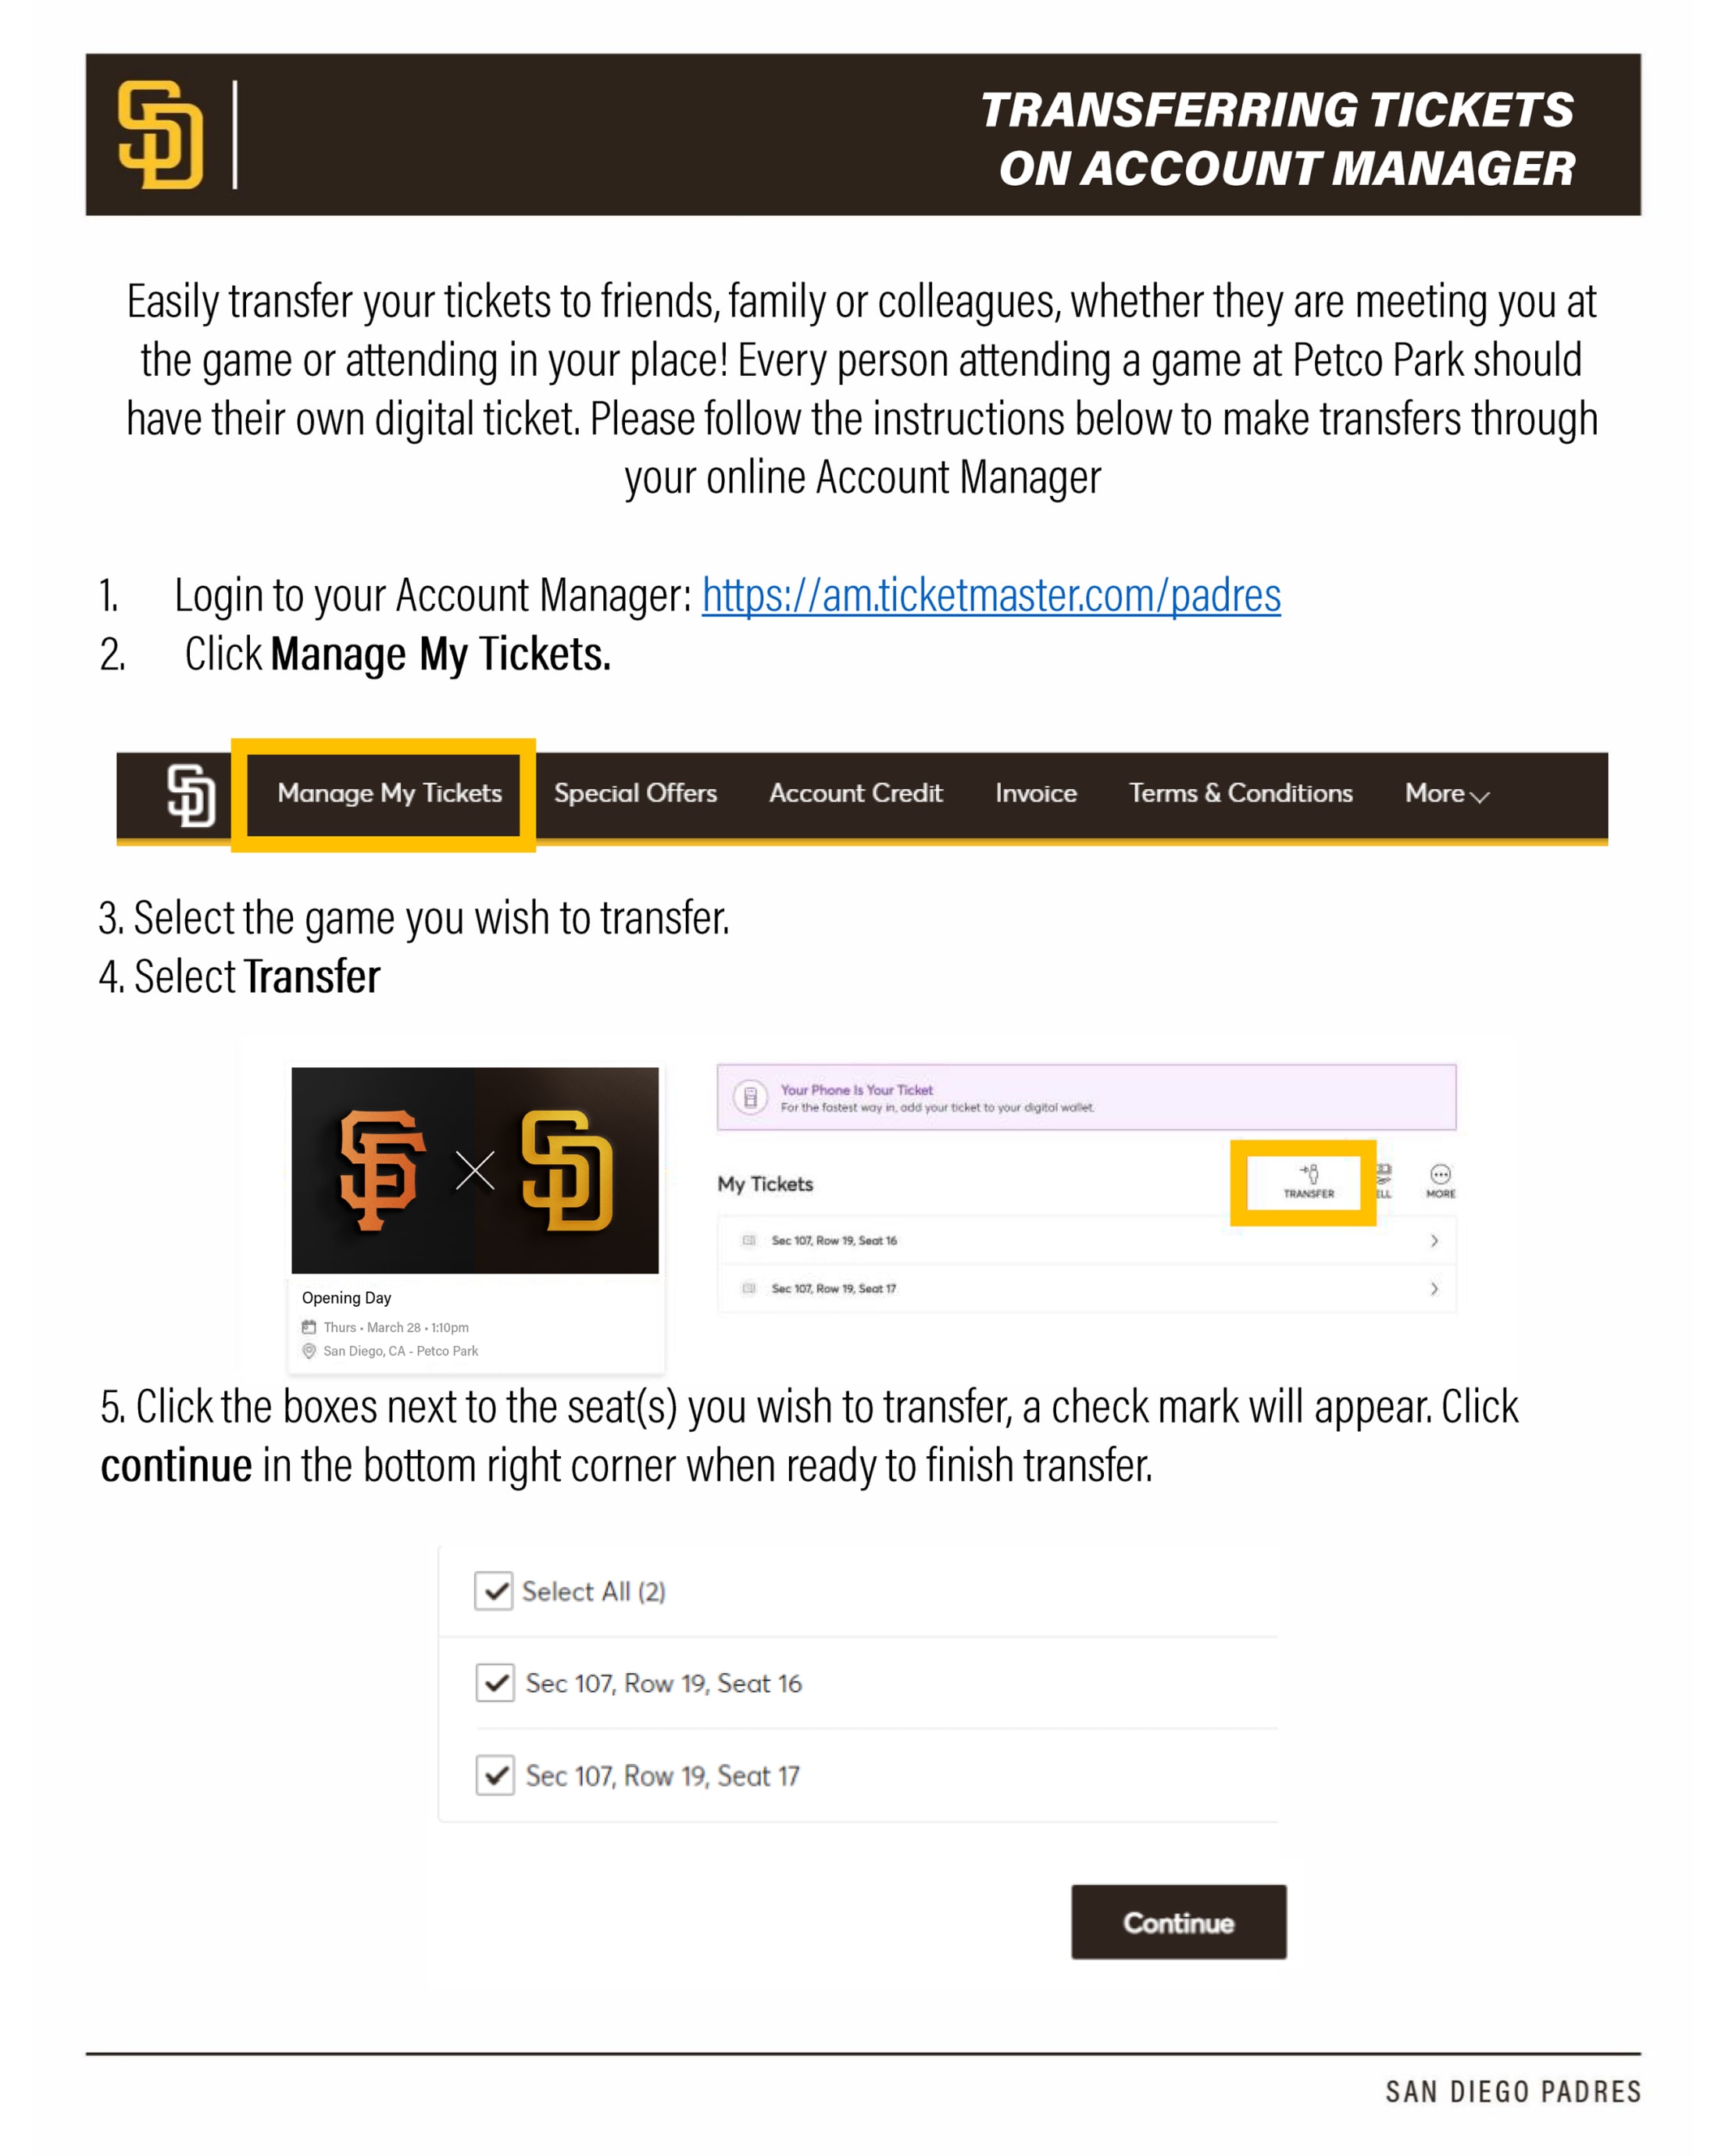
Easily send your tickets to friends, family or colleagues, whether they are meeting you at the game or they are attending in your place! Every person attending a game at Petco Park should have their own digital ticket. Please follow the instructions below to make transfers through your online Account Manager:
- Login to your Account Manager
- Click Manage My Tickets.
- Select the game you wish to transfer.
- Select Transfer.
- Click the boxes next to the seat(s) you wish to transfer so a check mark shows up and then click Continue in the bottom right-hand corner.
- Add your recipient’s first and last name, e-mail address and an optional message and then press Transfer.
- You will receive confirmation that the tickets have been transferred. Your recipient will receive an e-mail prompting them to accept the transfer and has until the day of the game to accept.
- If you wish to cancel the transfer, click the game you transferred and then click Cancel Transfer next to the seats you wish to cancel. You will be asked to confirm the cancel, once you confirm – the tickets will then be put back on your account (this may take a few moments).
HELPFUL HINTS
- Your recipient will need to download the MLB Ballpark app in order to receive the tickets.
• If the recipient has already accepted the transfer, you will need to contact them to have them transfer the ticket(s) back to you – you cannot cancel a transfer once the tickets have been accepted.
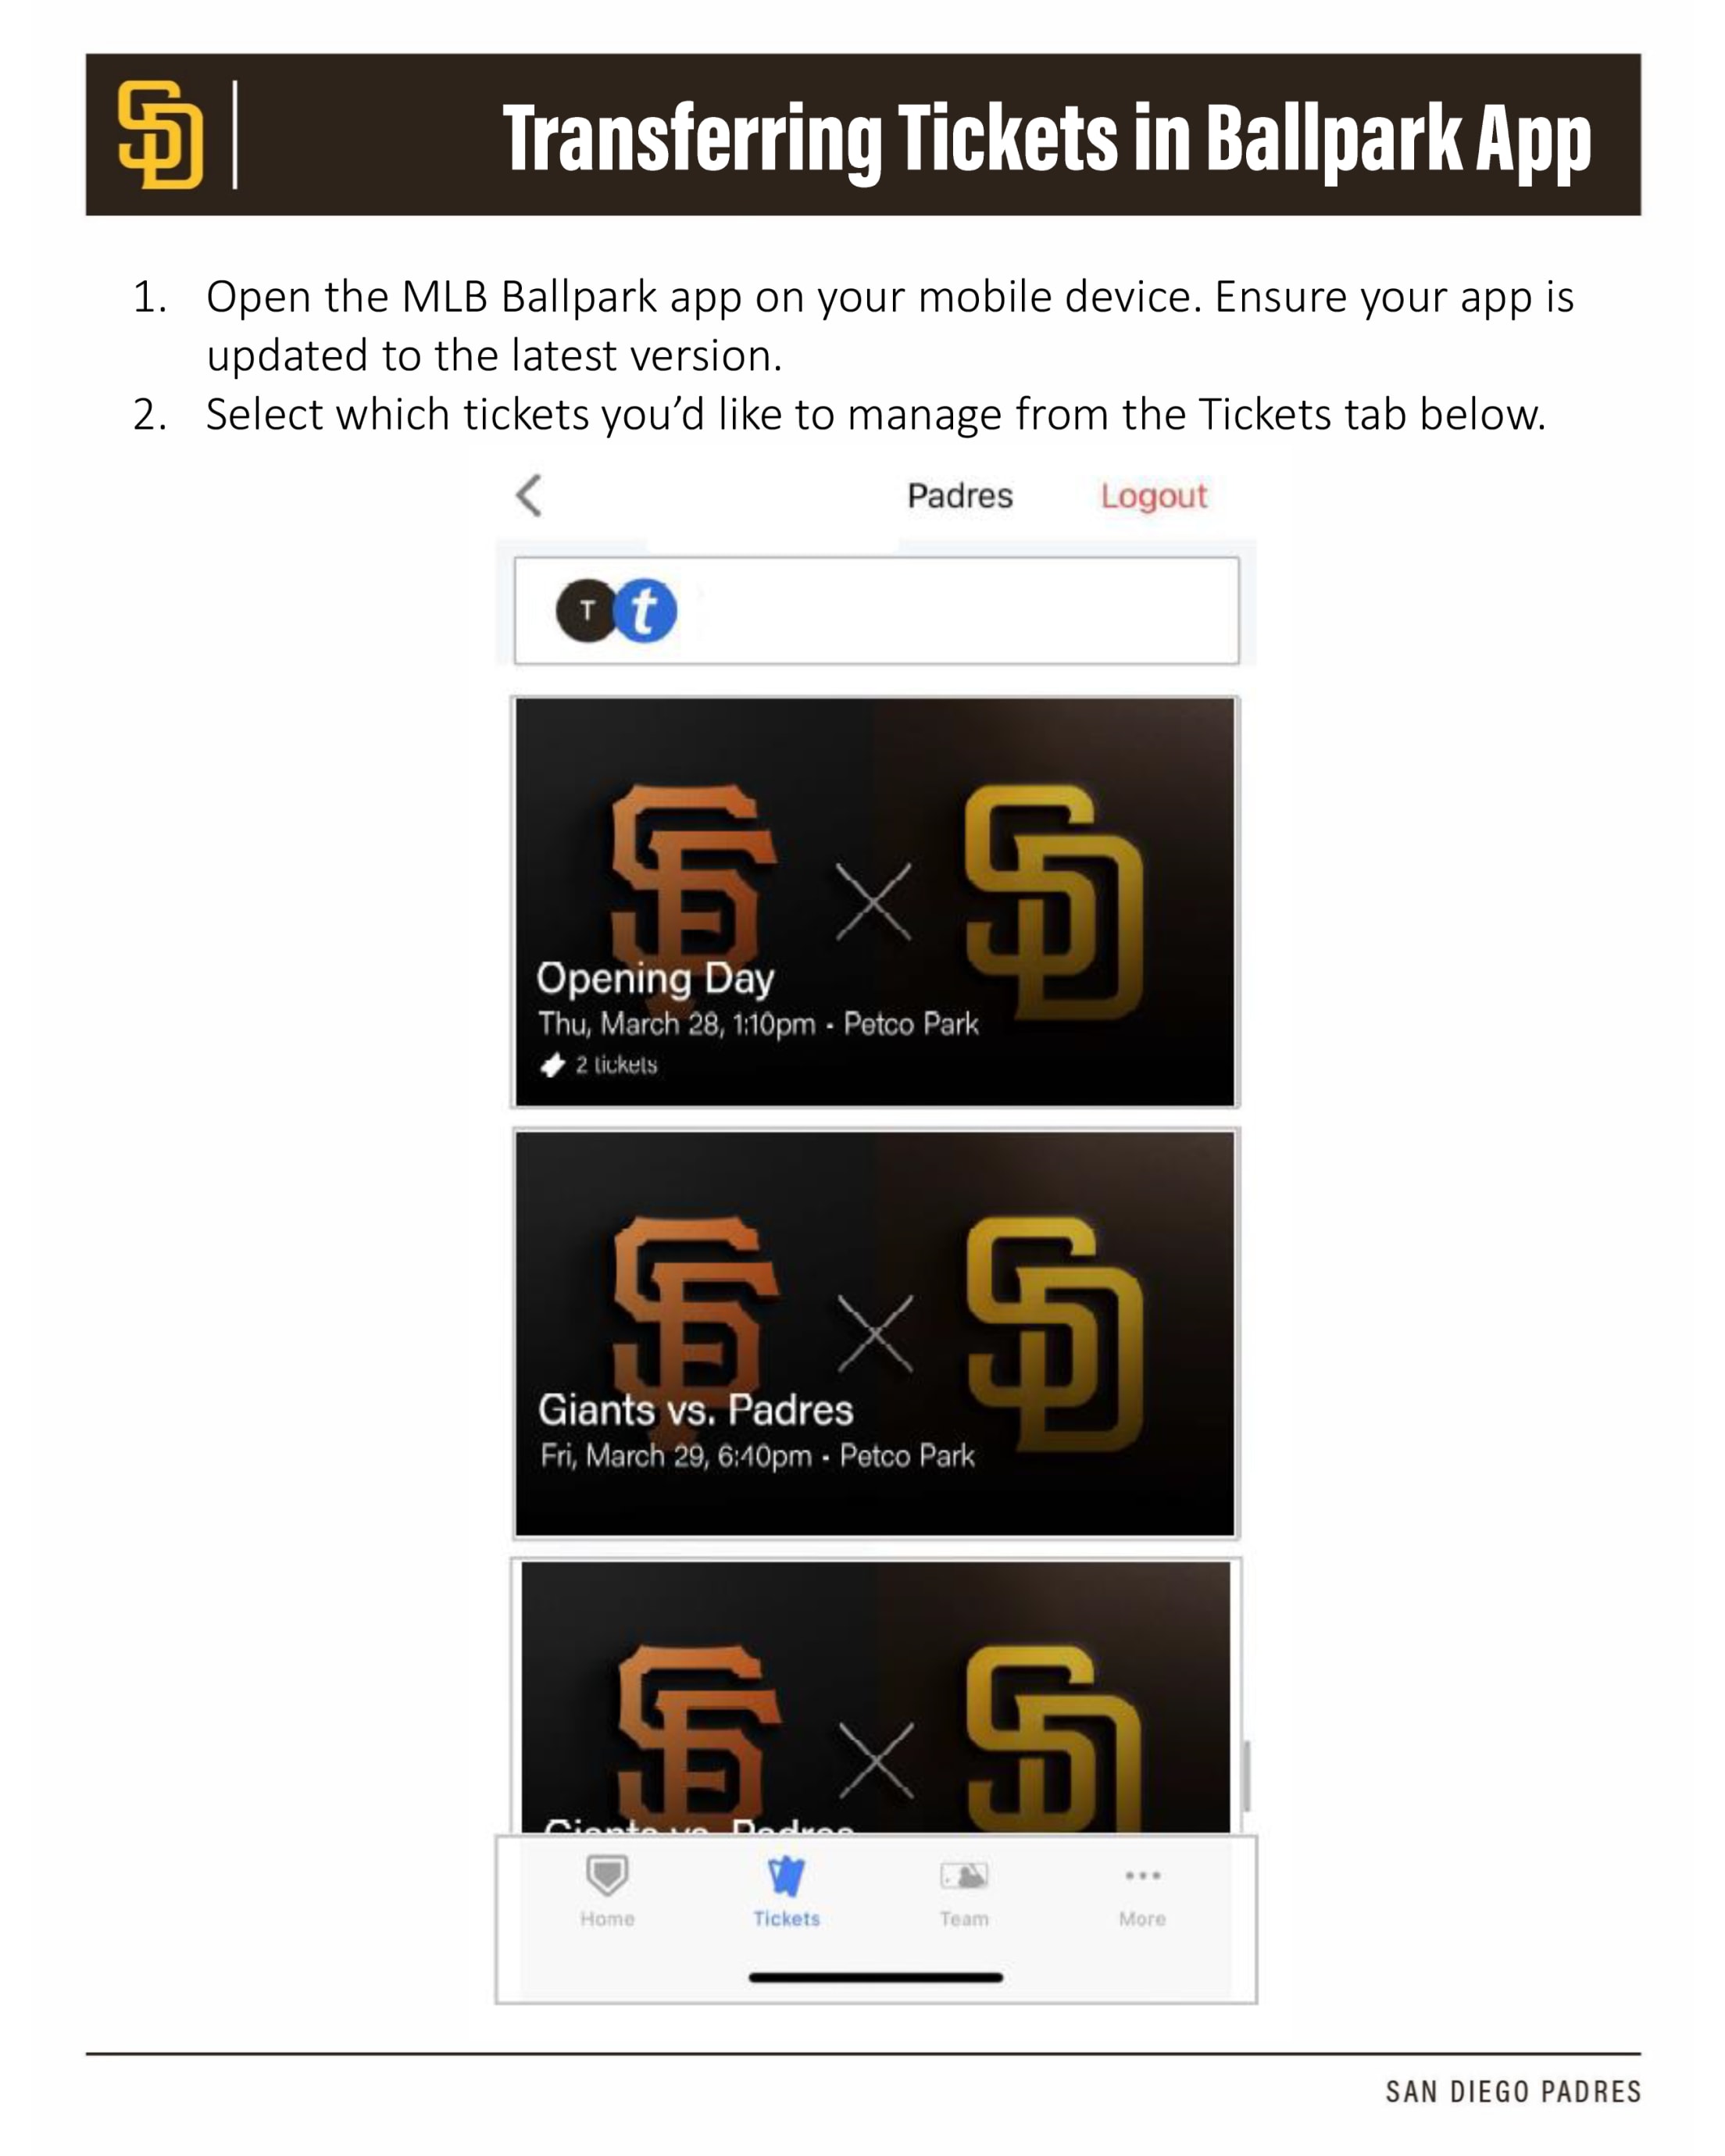
How to transfer tickets via the Ballpark app
- Open the MLB Ballpark app and click the Tickets tab.
- Click the Wallet tab within the Tickets tab.
- Select the game you would like to transfer.
- Select the ticket(s) you would like to transfer.
- Select Transfer Tickets.
- You can select: Select from Contacts to text the tickets, Via Email to email the tickets, or Share Link to text or email the tickets. Please note – if you text the tickets, your recipient will need to have the MLB Ballpark app downloaded on their smart phone in order to accept them.
- If you wish to cancel the transfer, you can do so through your online Account Manager. Login at www.Padres.com/my account with your Padres account credentials. Click Manage Tickets at the top and select the game you transferred. Click Cancel Transfer next to the seats you wish to cancel. You will be asked to confirm the cancel, once you confirm – the tickets will available on your account, which may take a few moments.
HELPFUL HINTS
- Your recipient will need to download the MLB Ballpark app in order to receive the tickets.
- If you send the tickets to the wrong e-mail address or send the wrong game, you can cancel the transfer before the recipient accepts the transfer by following the instructions listed at Step #6.
- If the recipient has already accepted the transfer, you will need to contact them to have them transfer the ticket(s) back to you – you cannot cancel a transfer once the tickets have been accepted.
- Unclaimed/unaccepted tickets expire and will be returned to sender 2 hours prior to first pitch if not claimed prior to that.
How to accept tickets that were transferred via email
- Check your inbox for an email from San Diego Padres.
- Press Accept Tickets. Please note you have until 2 hours after first pitch on the day of the game to accept the ticket(s).
- Enter your email address for your Padres account and press Next. If you do not have a Padres account, press Sign Up and follow the prompts to create one.
- To view your ticket, scroll to the bottom of the page and press on the ticket.
- Add your ticket to your Apple Wallet or Google Wallet, if you would like. If the email used for the ticket transfer is linked in the MLB Ballpark App, the ticket will automatically populate in the MLB Ballpark App in the Tickets tab (please note this may take a few minutes).

SEASON TICKET MEMBER-SPECIFIC ACTIONS
Exchange Tickets
Ticket exchanges help you accommodate your busy schedule. You can exchange a maximum of 50% of your Membership tickets to add on seats to games you have in your plan or get tickets to games you don’t have in your plan, based upon availability. Only season tickets within your Membership are eligible to be exchanged. To learn more, click here.

How to donate tickets
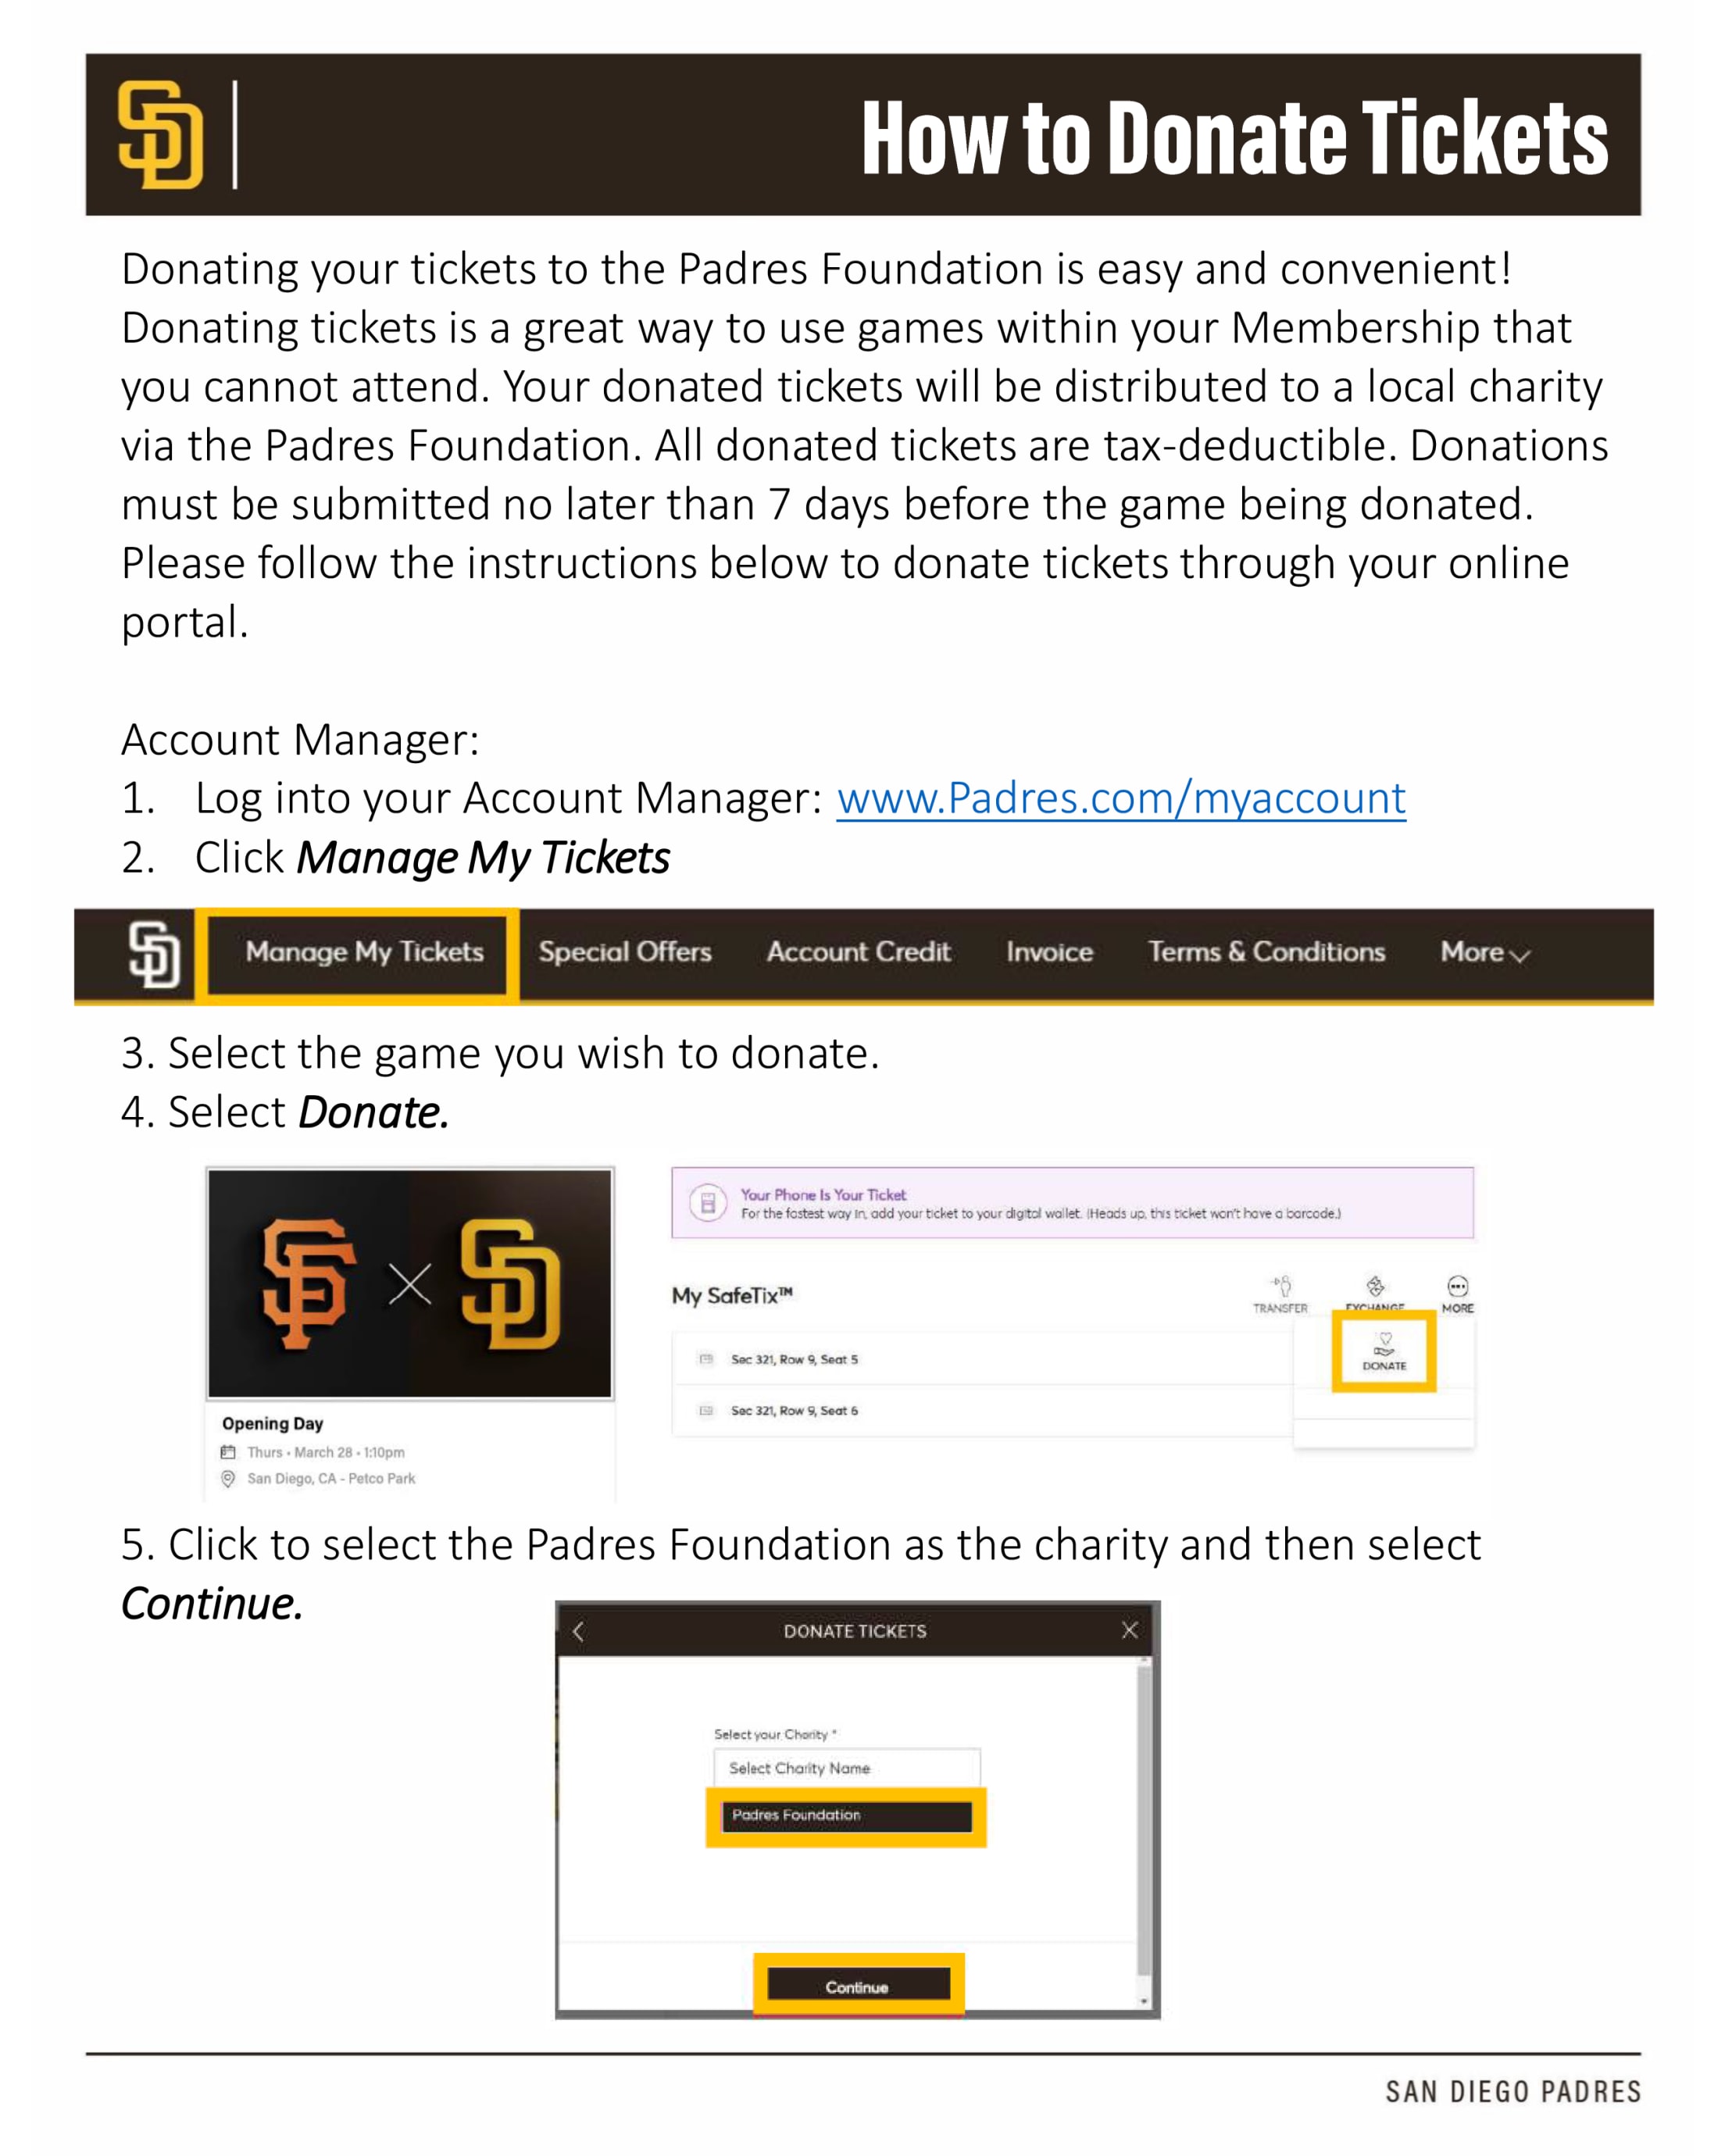
Donating your tickets to the Padres Foundation is easy and convenient! Donating tickets is a great way to use games within your Membership that you cannot attend. Your donated tickets will be distributed to a local charity via the Padres Foundation. All donated tickets are tax-deductible.
Please follow the instructions below to donate tickets through your online Account Manager:
- Login to your Account Manager
- Click Manage My Tickets.
- Select the game you wish to donate.
- Select Donate.
- Click to select the Padres Foundation as the charity and then select Continue.
- Confirm the donation – please note donated tickets cannot be reclaimed. There is not another step after confirmation, check the game date carefully before clicking Confirm.
HELPFUL HINTS
- Donations must be made through your online Account Manager at minimum 7 days prior to the game you wish to donate – this ensures the tickets get distributed to a deserving recipient.
- You cannot reclaim donated tickets – once tickets are donated, the tickets are removed from your account.
- All donations are tax-deductible. Tax information will be sent to you upon request in December 2024.
- The Padres Foundation is the primary source of funding for the club’s outreach initiatives in the areas of Live, Learn, Play, Serve or children’s health, education, fitness, and youth baseball/softball. There are many ways to donate to the Padres Foundation outside of donating tickets. For more information on the Padres Foundation please visit their website at mlb.com/padres/community/padres-foundation.
How to purchase parking
- Login to your online Account Manager: www.padres.com/myaccount.
- Click on Special Offers.
- Scroll down until you find Member Parking and click Select.
- Find the date of the game you wish to purchase parking for and click Select.
- A map of the Padres Membership discounted parking locations will appear highlighted in blue. Click preferred parking area.
- Once a parking area is selected, the Member discounted rate will appear on the right-hand side of the screen to show you how much Member discounted parking is for that game. Click Add to Cart and click on shopping cart to check out.
PARKING TIPS
- Membership discounted parking is only available through your online Account Manager – you cannot purchase it through the MLB Ballpark App.
- Discounted parking must be purchased a minimum of four (4) hours prior to first pitch (based upon availability).
- Parking passes will be delivered digitally to your MLB Ballpark App (this may take a few minutes to sync after purchase).
- You do not need to have any physical ticket to place in your window. A ticket attendant at the entrance of the lot/structure will scan your digital ticket.

How To View/Manage Invoices
- Login to your online Account Manager.
- Click on View My Invoice.
- Click on the invoice you wish to view/manage.
- Click Continue.
- Select your Payment Option.
- Click Add Payment Method. Please note that your credit card associated with your Membership payment does not automatically save in Account Manager. Therefore, you will need to add your card to your Account Manager profile.
- Once you add a credit card, you can save it to your online Account Manager to use for future use. If you do not wish to save your card, make sure to un-check the Save this card to the account button.
- Accept the Terms and Conditions and click Pay Now.

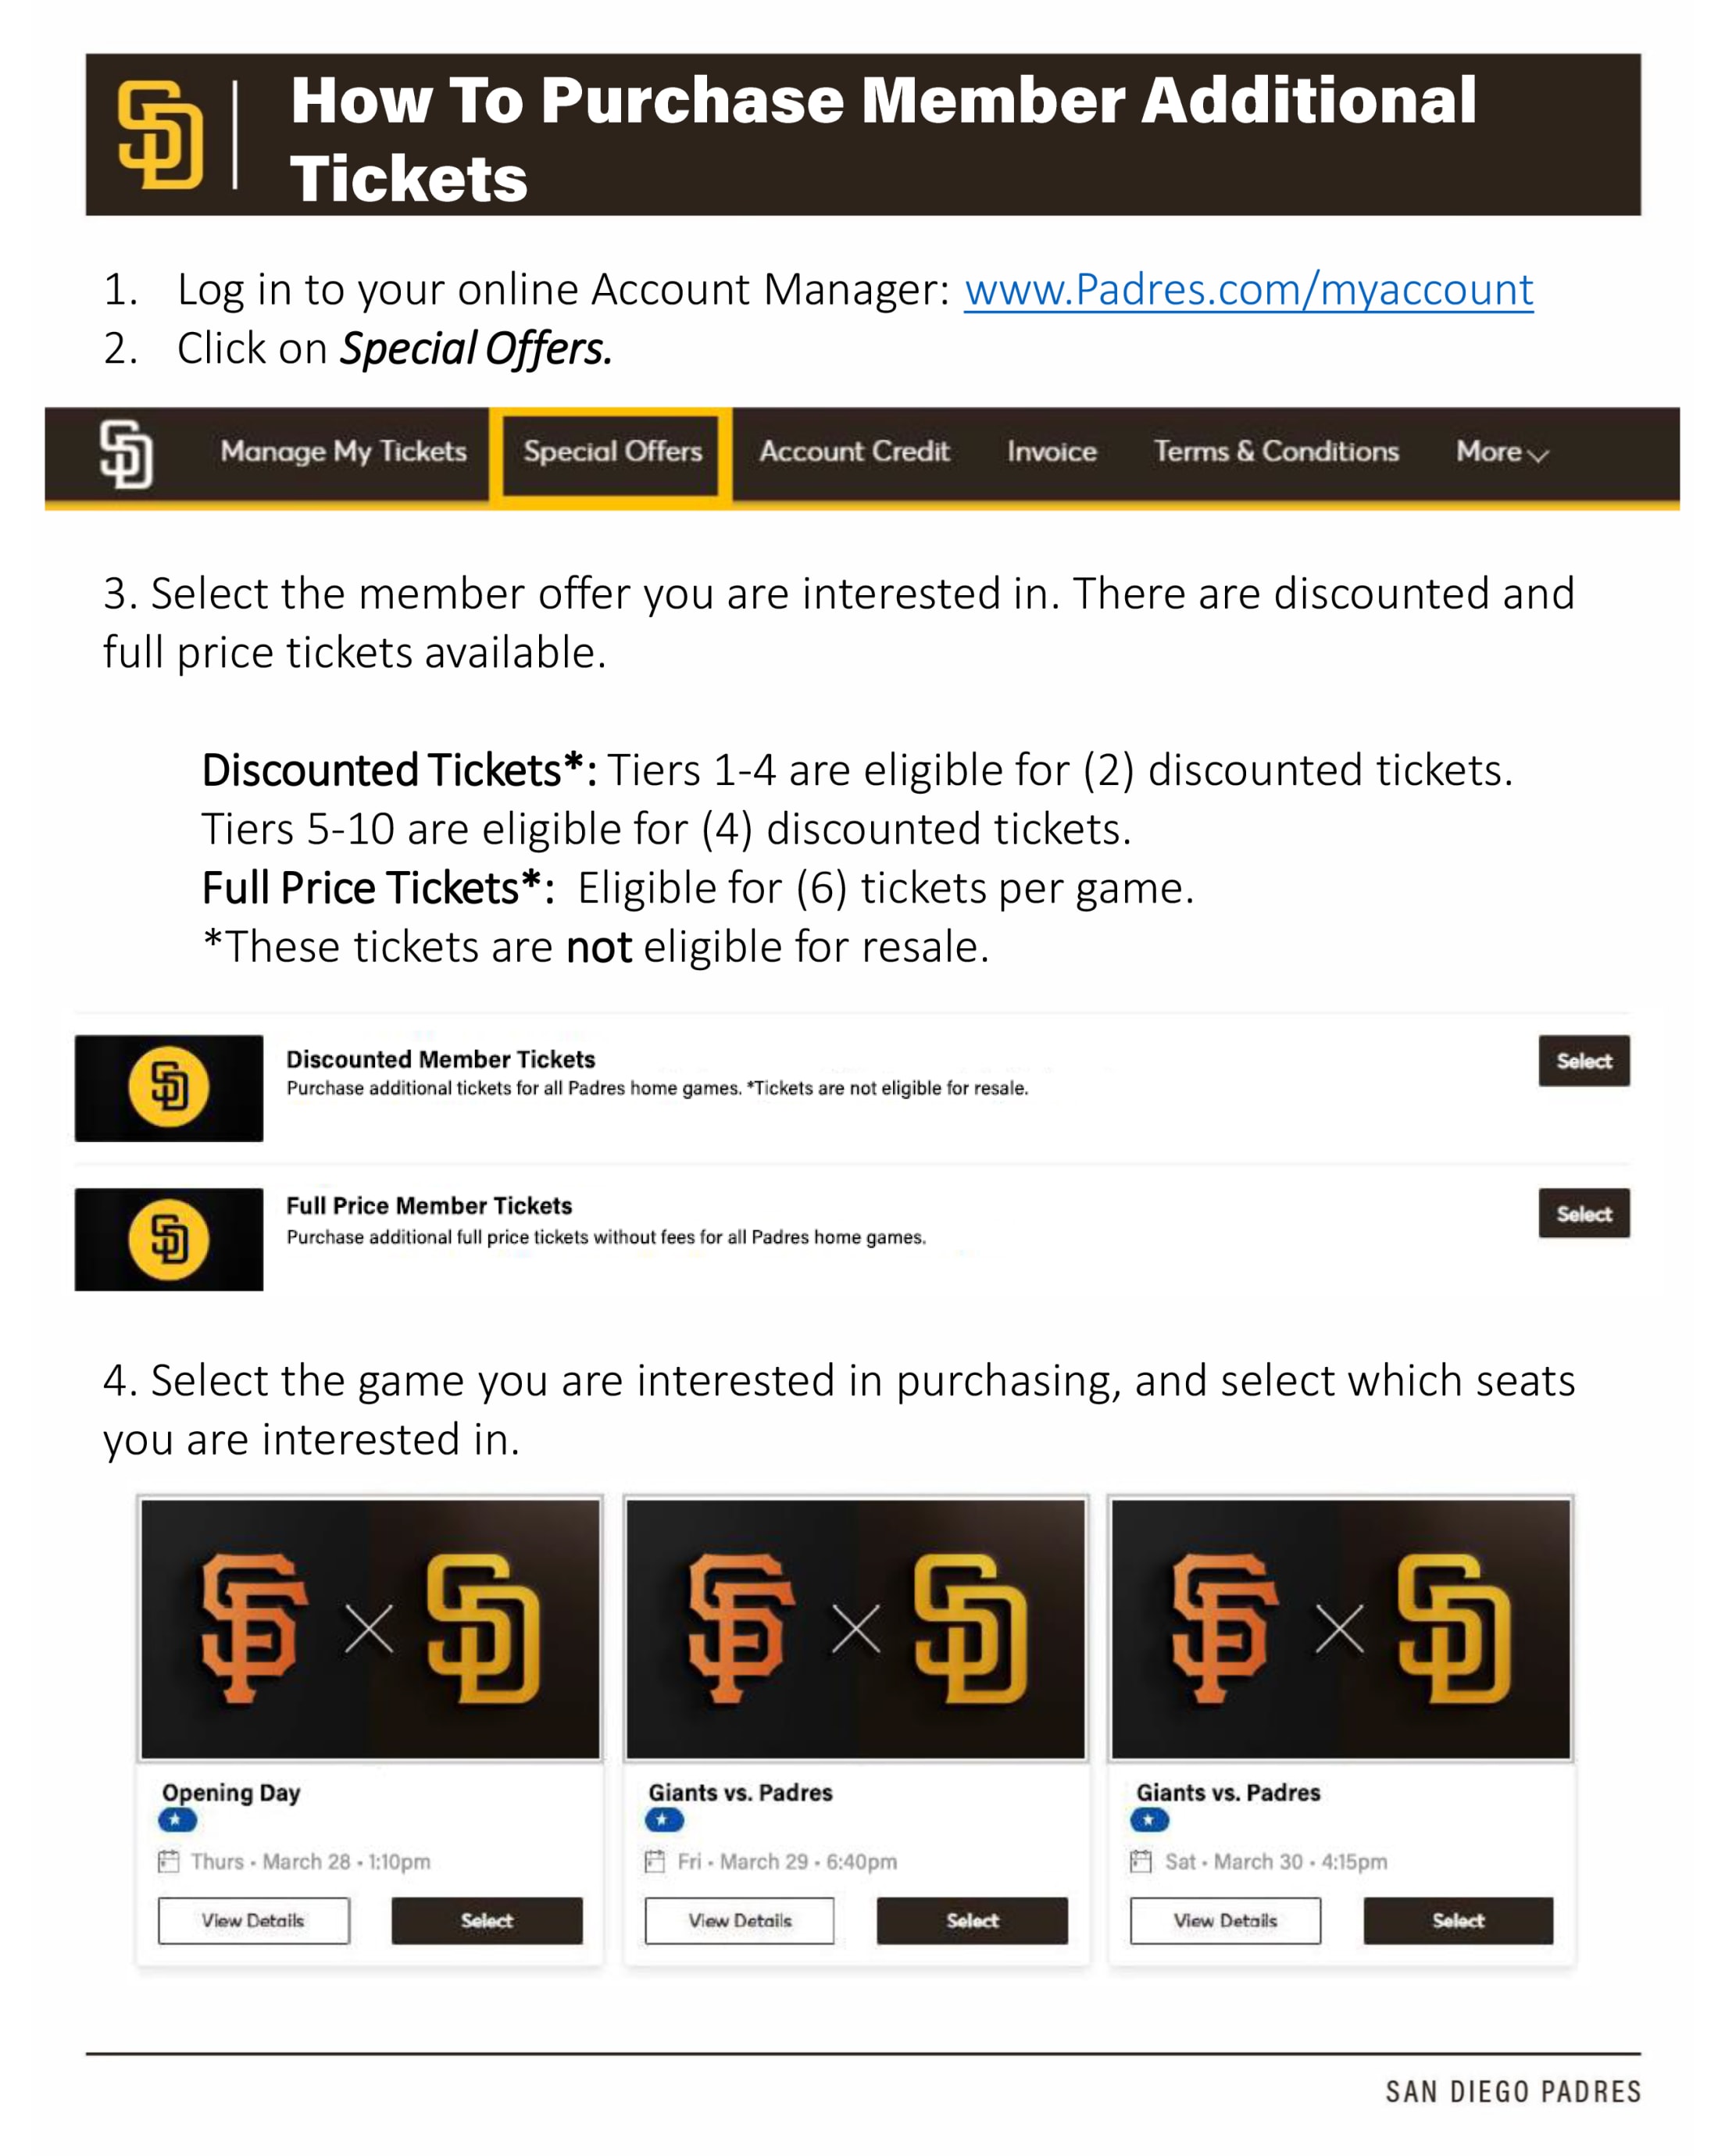
How to purchase additional Member tickets
- Login to your online Account Manager: www.padres.com/myaccount
- Click on Special Offers.
- Please note that Additional tickets purchased at the Member discounted rate cannot be resold.
- Select the member offer you are interested in, there are both discounted and full price tickets available.
- Click Select next to the game for which you wish to purchase additional tickets.
- Note the filters at the top of the screen. The ticket quantity will automatically default to "2", if you are looking to purchase more or less than 2 tickets, you will need to adjust the quantity using the plus and minus buttons. You are also able to filter by price and ADA needs.
- Select the area you wish to purchase seats in. Note that Members are only eligible to receive their Membership discount in sections where your Membership Level is sold.
- Example: Blue Members can only purchase where Blue Memberships are sold. You are welcome to purchase additional tickets outside of your Membership Level locations, but you will be charged at the single game rate.
- Once you have selected the ticket(s) you would like to purchase, they will be added to your shopping cart in the top right corner of the screen.
- Click the Shopping Cart icon and click Continue.
- Confirm the seats you selected are correct. If they are not correct, you can click the pencil (edit) button or the trash can (delete) button. Click Checkout once you confirm.
- Choose to add parking or a pregame tour if available for your game selection.
- Select your payment option. Please note that your credit card associated with your Membership payment does not automatically save in Account Manager. Therefore, you will need to add your card to your Account Manager profile. Additional tickets must be paid in full upon checkout; they cannot be added to your monthly payment plan.
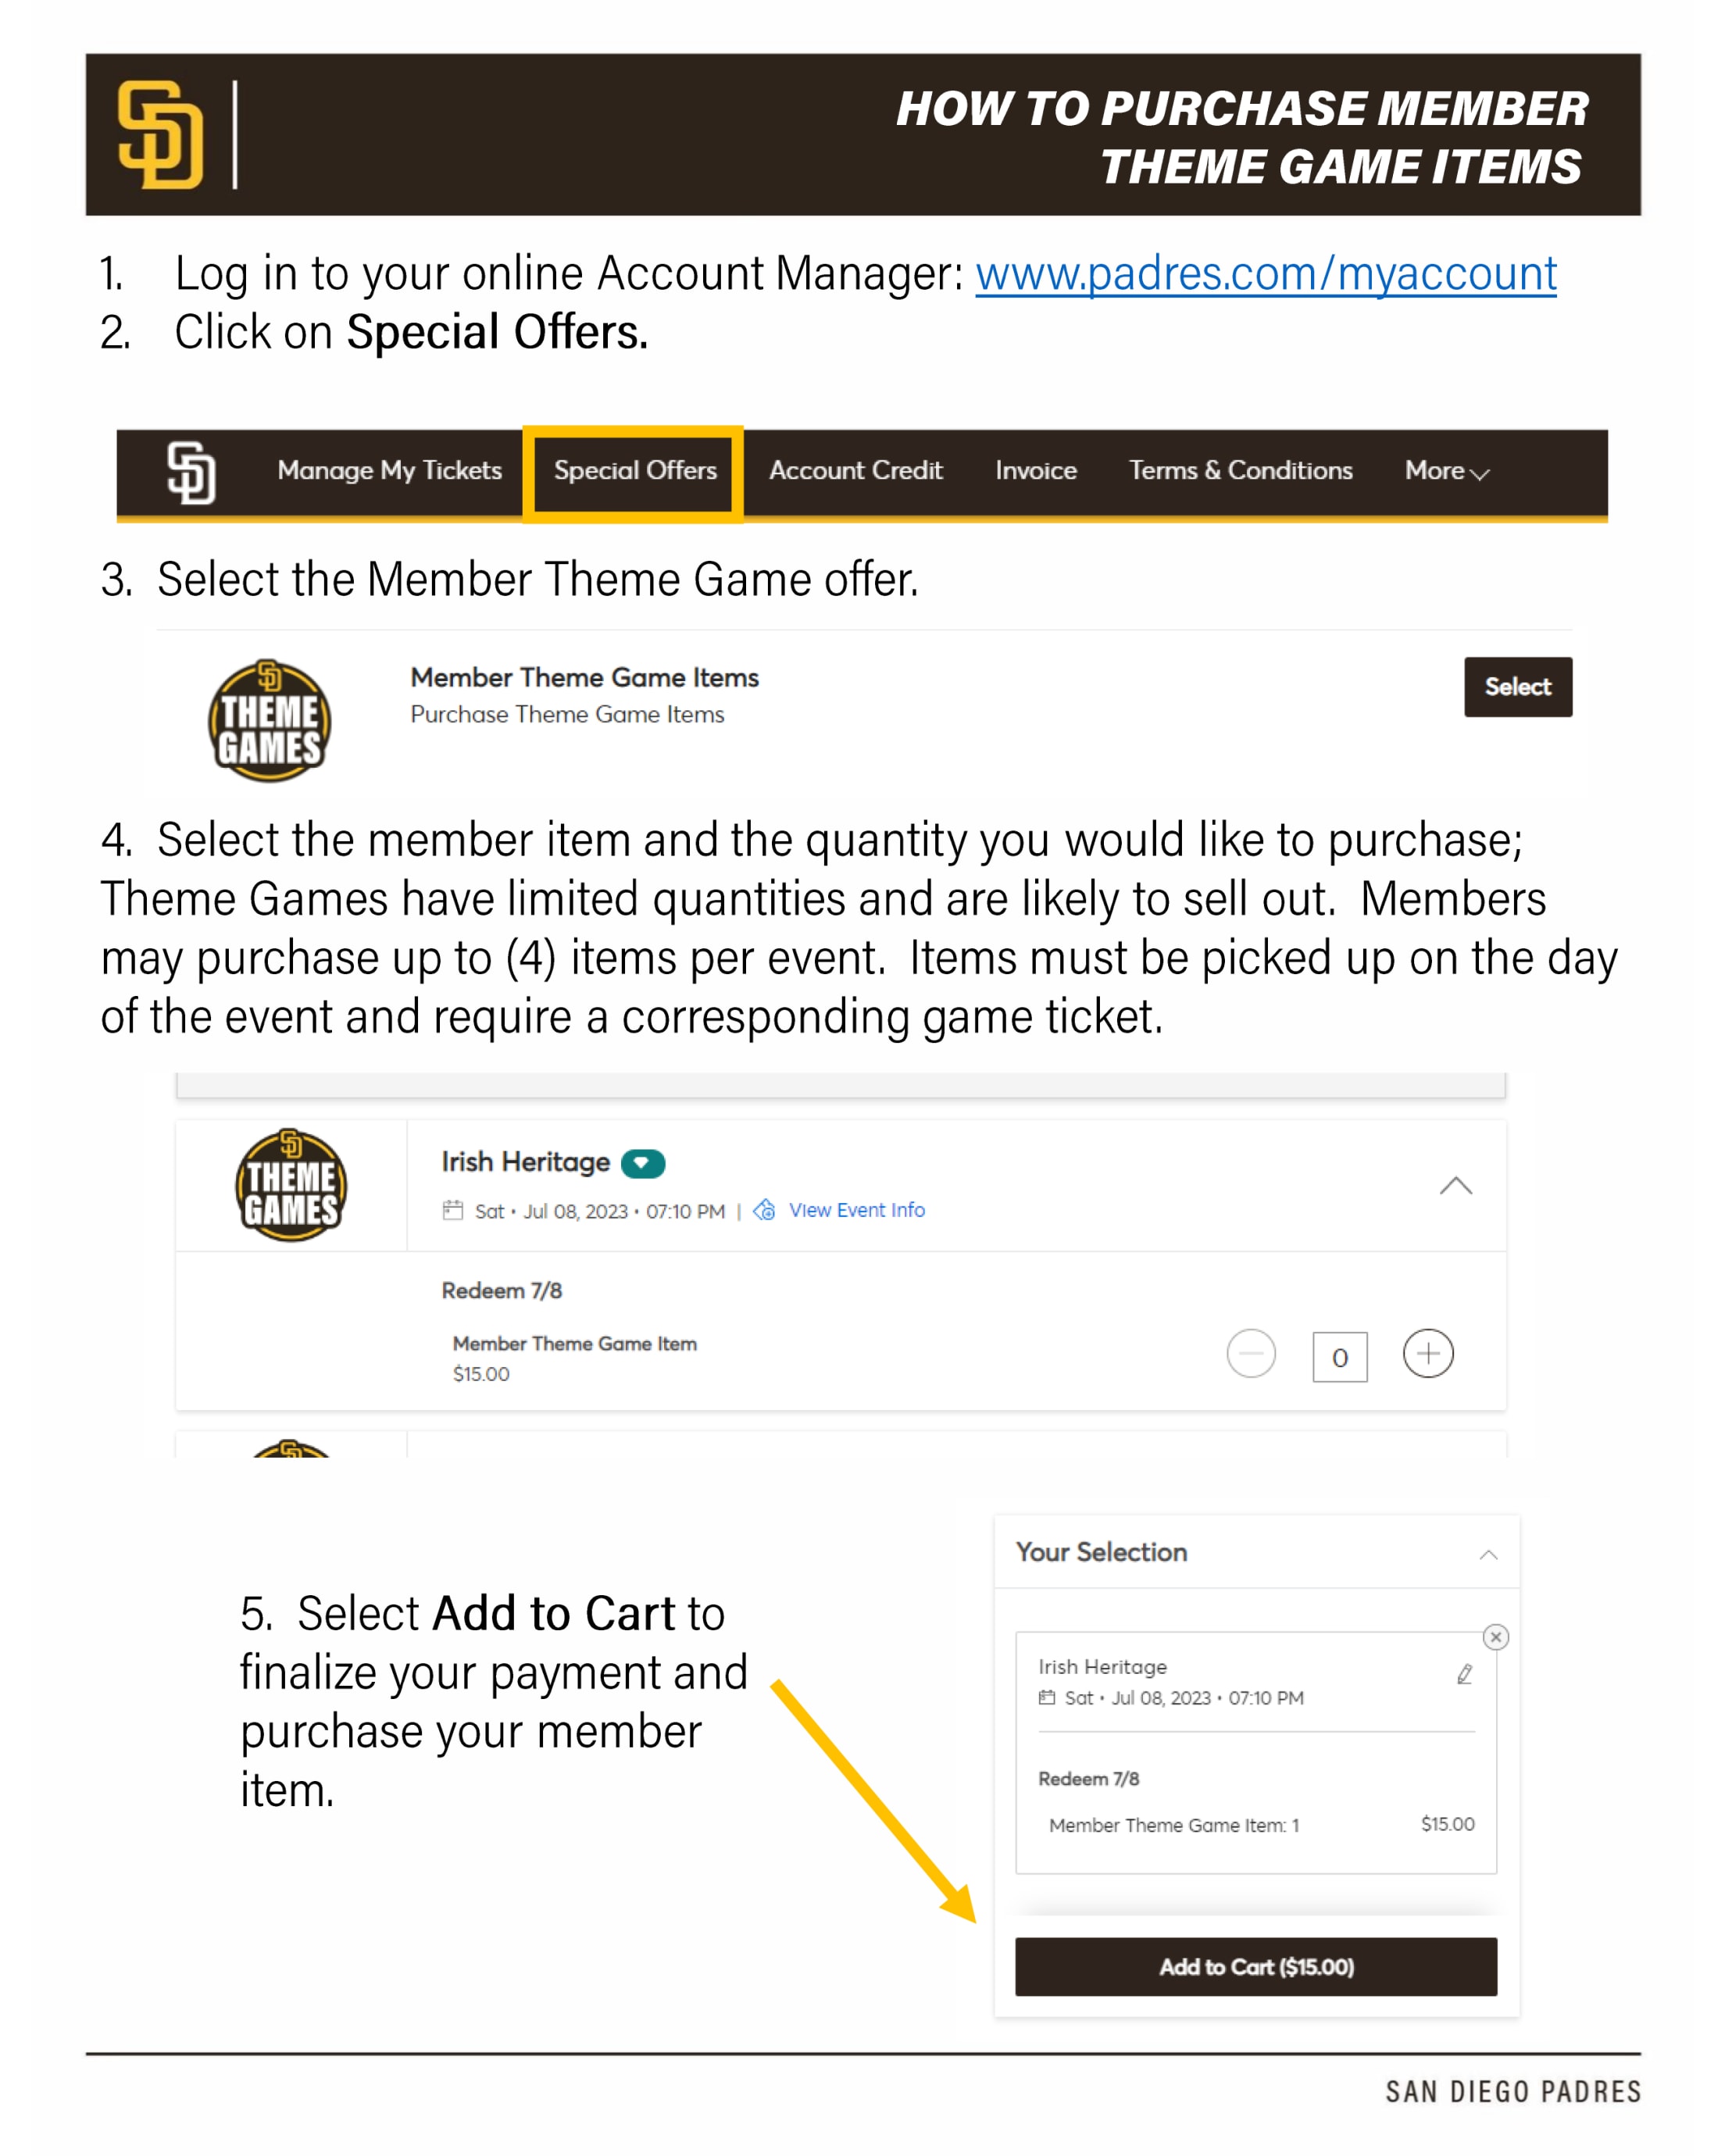
How to purchase Member Theme Game items
- Login to your online Account Manager: www.padres.com/myaccount
- Click on Special Offers.
- Scroll down and click on Select by Member Theme Game Items.
- Note that you must have a valid game ticket for the event date in order to redeem the Theme Game Item. Theme Game Items are not included in your Membership and are not given to all fans on the day of the game. They are only distributed to fans who purchase a Theme Game Ticket as well as Members who purchase the Theme Game Item.
- Find the Theme Game Item you wish to purchase and click the + button to add up to four (4) to your cart.
- Click Add to Cart to add the items to your cart.
- Click the Continue button to check out the items in your cart.
- Confirm the item(s) you selected are correct. If they are not correct, you can click the pencil (edit) button or the trash can (delete) button. Click Checkout once you confirm.
- Select Ballpark App under Delivery and Shipping and Submit your acknowledgement of the Terms and Conditions.
- Select your payment option. Please note that your credit card associated with your Membership payment does not automatically save in Account Manager. Therefore, you will need to add your card to your Account Manager profile. Theme game items must be paid in full upon checkout; they cannot be added to your monthly payment plan
- Accept the Terms and Conditions and click Submit Order.
Resell your Tickets
SeatGeek is now the official Fan-to-Fan ticket marketplace of MLB for the 2024 season. For more information, please visit padres.com/seatgeek.
As a reminder, Padres Members reserve the right to sell up to 50% of their Membership tickets cumulatively over the course of the season via the secondary market, as well as a maximum of 50% of their Membership tickets at one time via the secondary market. Any tickets listed will count toward the 50% maximum threshold. Transferred tickets that are listed or resold will also count towards the 50% maximum threshold. Additional tickets purchased at the discounted Member rate cannot be resold and any Member that exceeds the thresholds are subject to ticket revocation.
Padres employees cannot access SeatGeek accounts nor offer advice on resale pricing.
Please contact your Account Specialist for more information on SeatGeek or the resale of tickets in general.
How to List Tickets on SeatGeek
- To sell tickets on SeatGeek, you will need to create a SeatGeek account. SeatGeek accounts are different from an MLB Ballpark or MLB team account. Visit here to get started!
- Log into your Padres.com Account Manager.
- Select Manage My Tickets.
- Select which game you wish to sell.
- Select Sell.
- Click the boxes next to the seat(s) you wish to sell. A check mark will appear. Click Continue in the bottom right corner when ready to list.
- You will now be re-directed to SeatGeek to continue your listing. Please select Continue.
- Login with your SeatGeek account. If you are already logged in, you may skip this step.
- Select which event you would like to sell.
- Your tickets eligible for resale will populate. Select the Sell button.
- Select the quantity, seat number, payout method, price you'd like to sell for, and the original ticket price if applicable. Note: The only payout method available will be by direct deposit. If this is your first-time listing tickets on SeatGeek, you will be required to enter this information to continue.
- Review your listing and select List Ticket when you are ready to sell.
- When your ticket is successfully listed, you will receive an email confirmation.

Editing/Delisting Tickets on SeatGeek
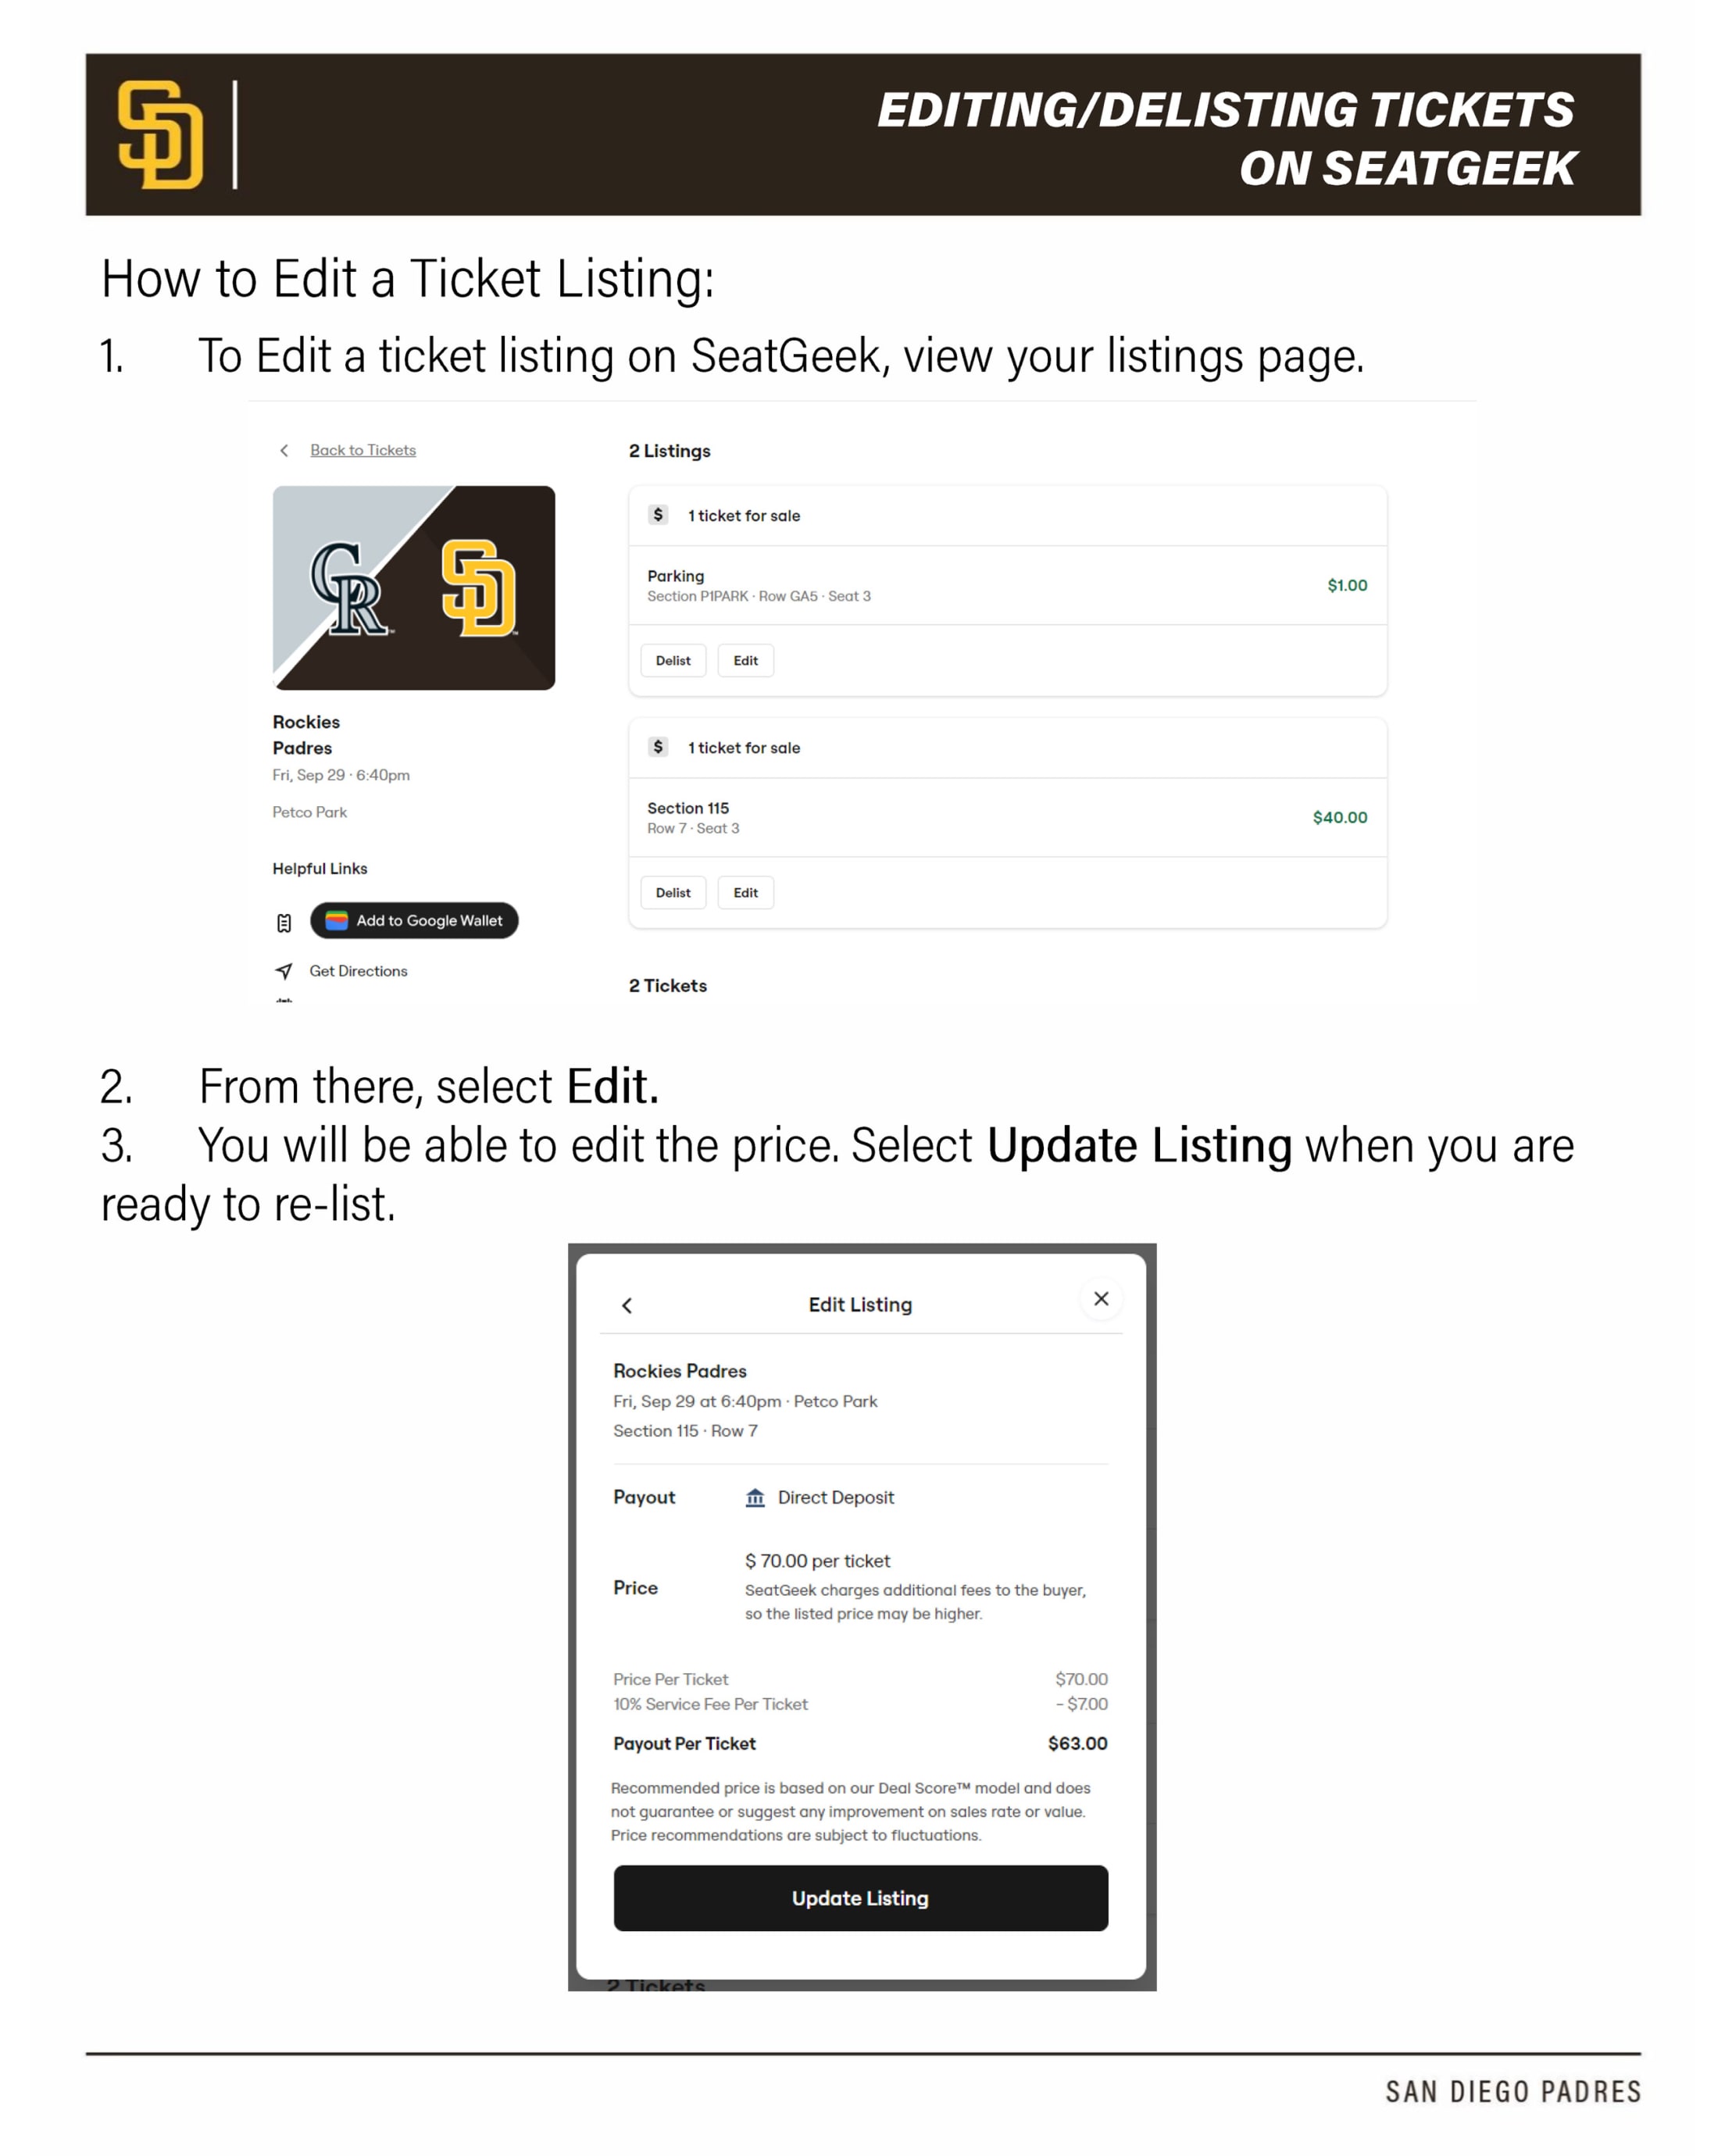
How to Edit a Ticket Listing on SeatGeek
- To edit a ticket listing on SeatGeek, view your listings page
- From there, select Edit.
- You will be able to edit the price. Select Update Listing when you are ready to re-list
- Once update you will receive an email confirmation that your listing has been edited.
How to Delist a Ticket Listing on SeatGeek
- To delist a ticket listing on SeatGeek, view your listings page.
- Select Delist.
- You will receive email confirmation your ticket(s) were delisted.